We can't find the internet
Attempting to reconnect
Something went wrong!
Attempting to reconnect
Building Multi-Level BOMs in ERPNext with Multilevel BOM Creator
A practical introduction to creating complete multi-level BOM structures in one place, including operations and reusable sub-assemblies.

Building a Multi-Level BOM in ERPNext with Multilevel BOM Creator
If you create products with multiple sub-assemblies, standard BOM creation can become repetitive very quickly. You create BOMs for child assemblies first, then BOMs for their parent assemblies level by level, and you keep switching context just to understand the full structure.
ERPNext also has BOM Creator, but it does not support operations and reuse of existing BOMs inside the same BOM creation tree.
Multilevel BOM Creator is meant to solve that. It lets you build the complete structure in one place, include operations in the same tree, reuse existing BOMs where needed, review quantities and cost impact, and then create the required BOMs from the same document.
This post uses a simple Office Chair example to show the flow.
Business Scenario: Office Chair
We will build a BOM for OFFICE-CHAIR with quantity 1 Nos.
The chair will have these direct children:
-
CHAIR-BASEqty1 -
GAS-LIFTqty1 -
ARMRESTqty2 -
WHEEL-ASSEMBLYqty4 -
SEAT-ASSEMBLYqty1 -
BACKREST-ASSEMBLYqty1 -
Operation -
Final Chair Assembly -
Operation -
Final Inspection
Inside WHEEL-ASSEMBLY, we will add:
-
WHEELqty1 -
AXLE-PINqty1 -
BOLTqty4
Inside SEAT-ASSEMBLY, we will add:
-
SEAT-CUSHIONqty1 -
SEAT-BOARDqty1 -
UPHOLSTERY-FABRICqty2 -
Operation
Seat Upholstery
For BACKREST-ASSEMBLY, we will reuse an already existing BOM.
That gives us a good mix of:
- direct child items
- new sub-assemblies
- an existing sub-assembly
- operations at different levels
- quantity and cost multiplication inside the tree
For this example, assume that all required items, operations, workstations, and the existing BOM for BACKREST-ASSEMBLY are already present in ERPNext.
1. Create the Document and Enter Final (Root) Product Details
Start a new Multilevel BOM Creator and enter the basic context for the product you want to build. In this example, that means selecting OFFICE-CHAIR, setting the company, quantity, and currency.
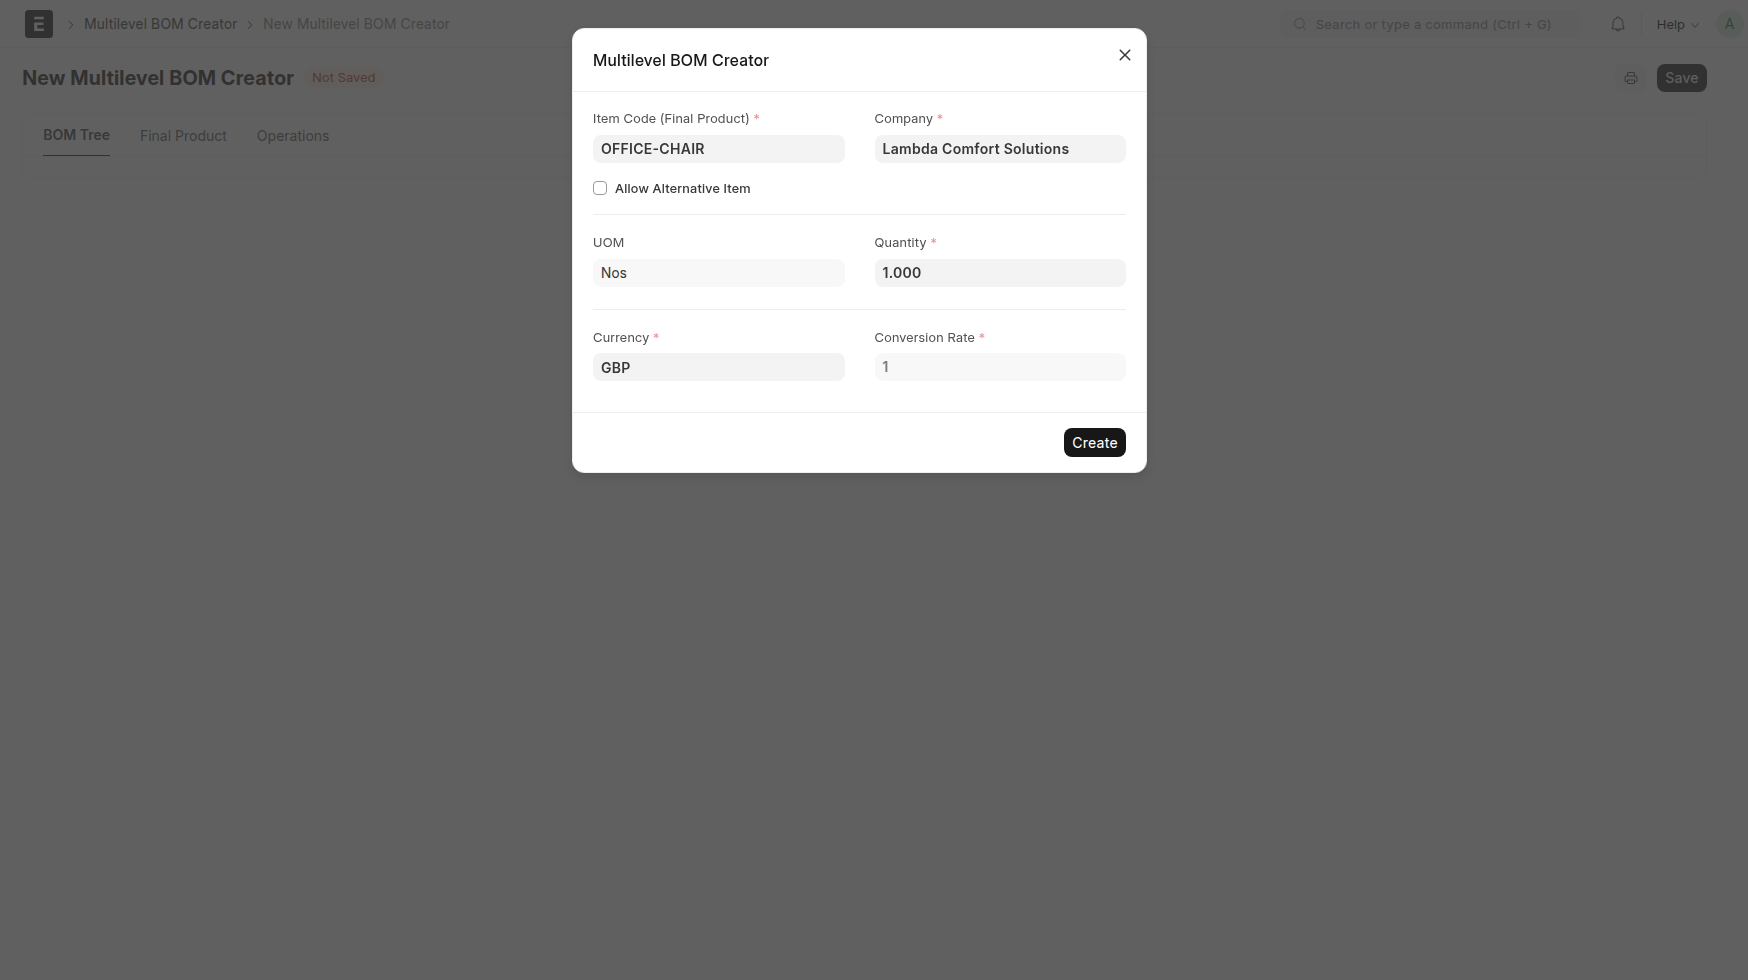 Caption: Create the document and enter the finished product details.
When Create is clicked, the BOM tree table shows the root node (first row) for this root item.
2. Add Direct Child Items
The first action most users will take is Add Item. In this example, we use it first for ARMREST with quantity 2.
Open the row menu on the root item and choose Add Item.
 Caption: Start from the row action menu on the root item and choose
 Add Item.
Fill the dialog with the item details and quantity required for one chair.
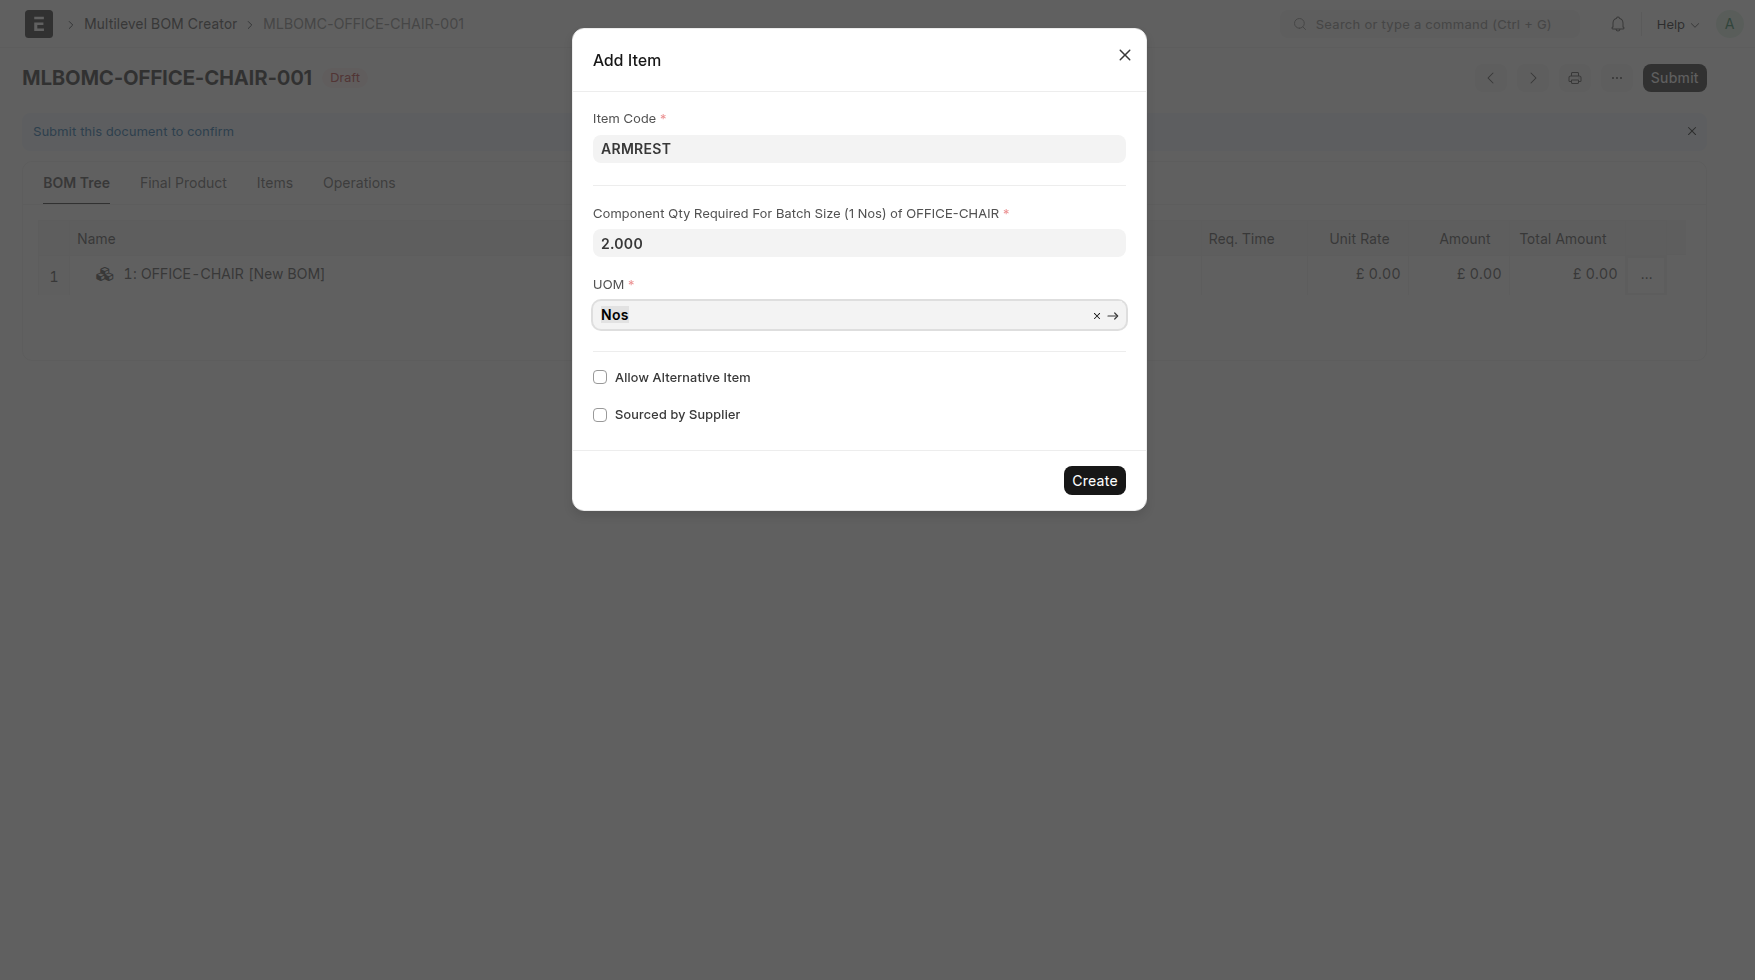 Caption: Enter the first direct child item details in the
 Add Item dialog.
Once saved, the item appears directly under the finished (root) product. You can also immediately see updated quantity and cost information in the new row as well as in the parent row.
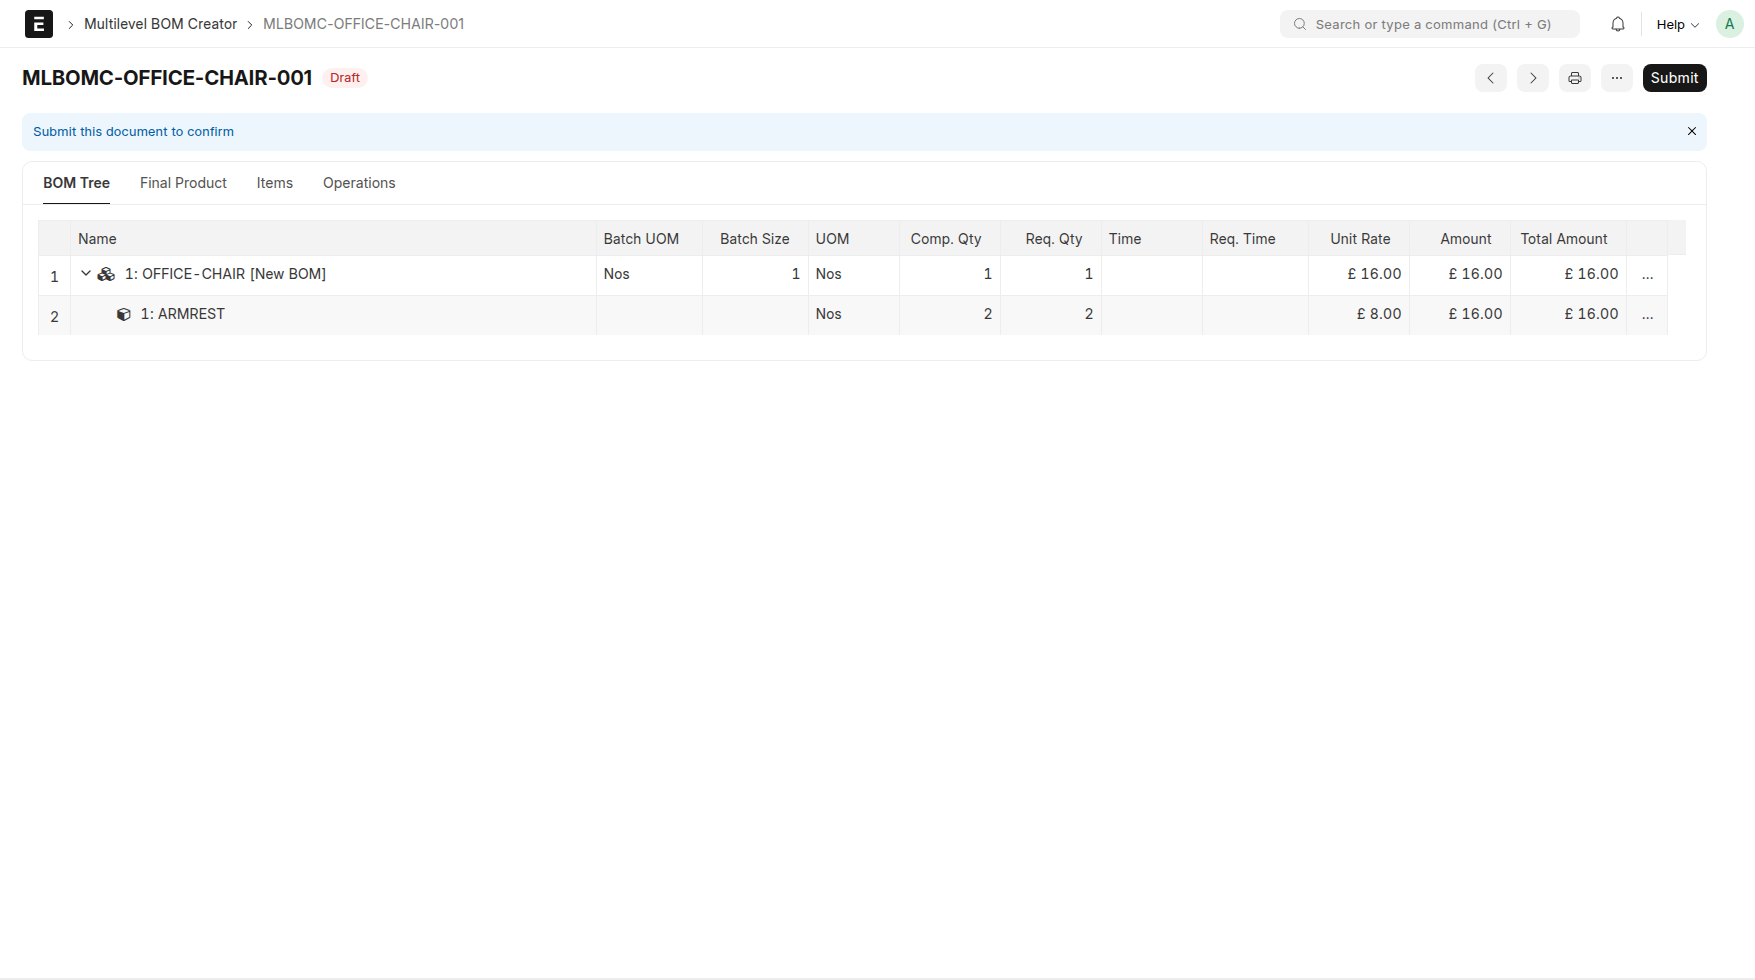 Caption: The first direct child item now appears under the final product.
After that, the remaining direct child items can be added the same way. In this example, we complete the root-level items by adding CHAIR-BASE and GAS-LIFT.
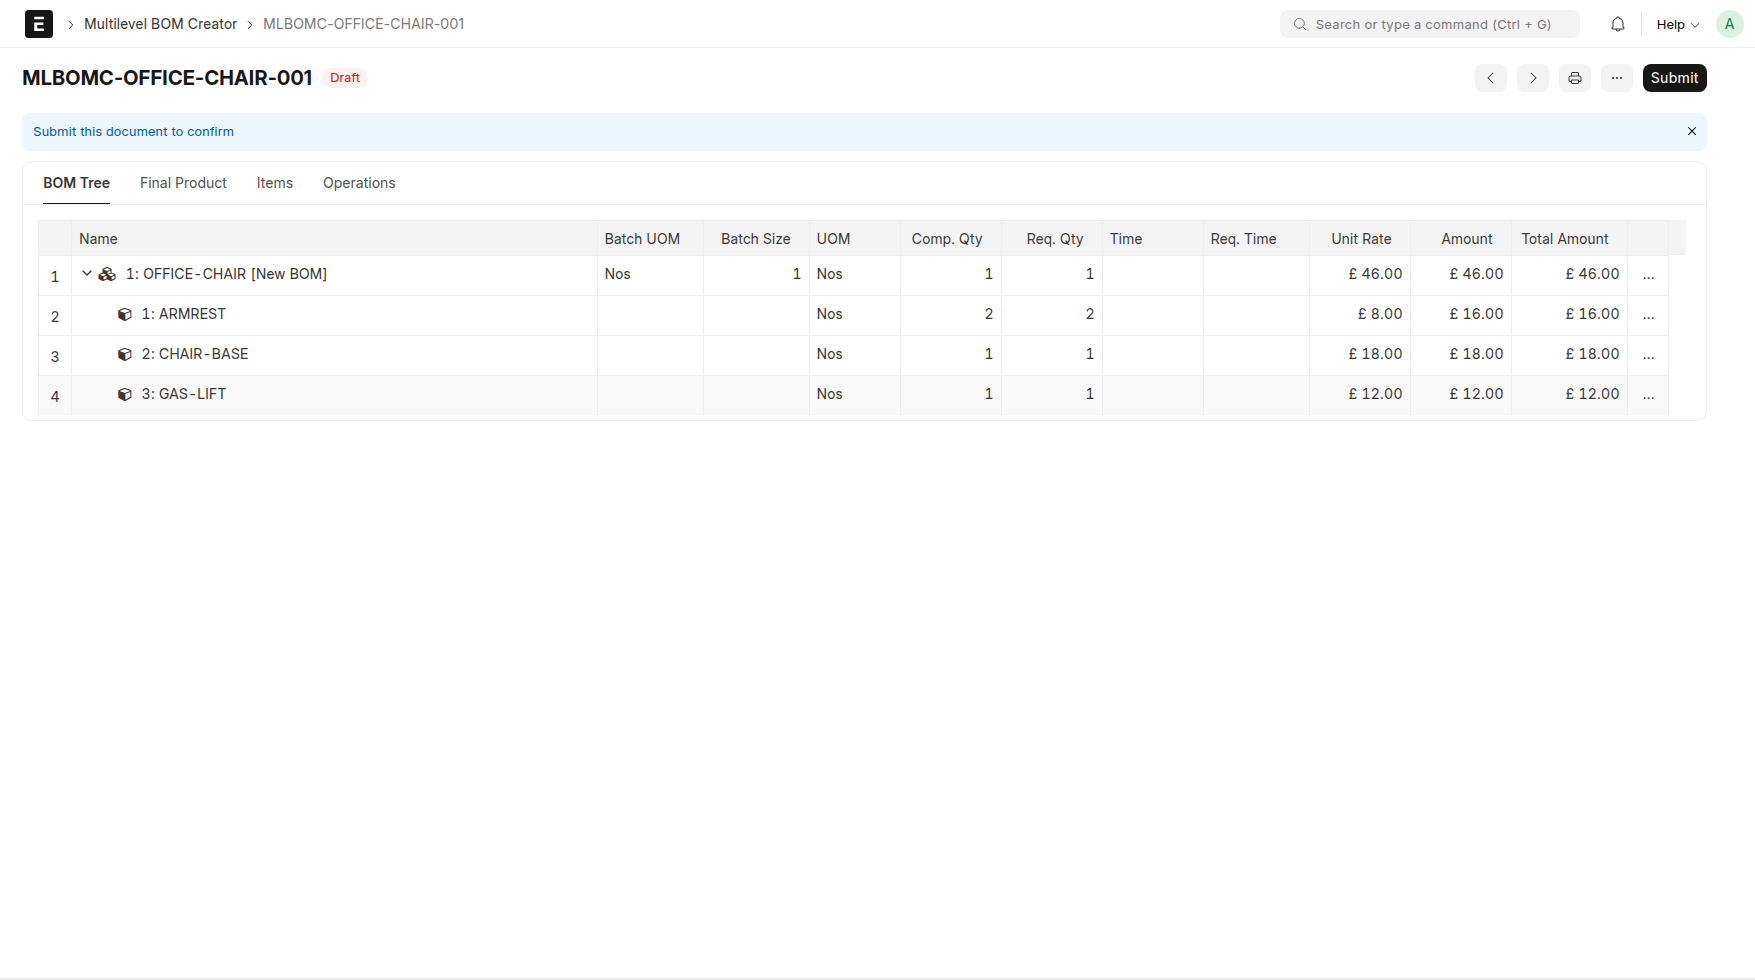 Caption: Add the remaining direct child items under the final product.
3. Add a New Sub-Assembly
The next useful action is Add New Sub-Assembly. We will use it for WHEEL-ASSEMBLY.
This is the right option when the child assembly does not yet have its own BOM and you want the system to create it from the current document.
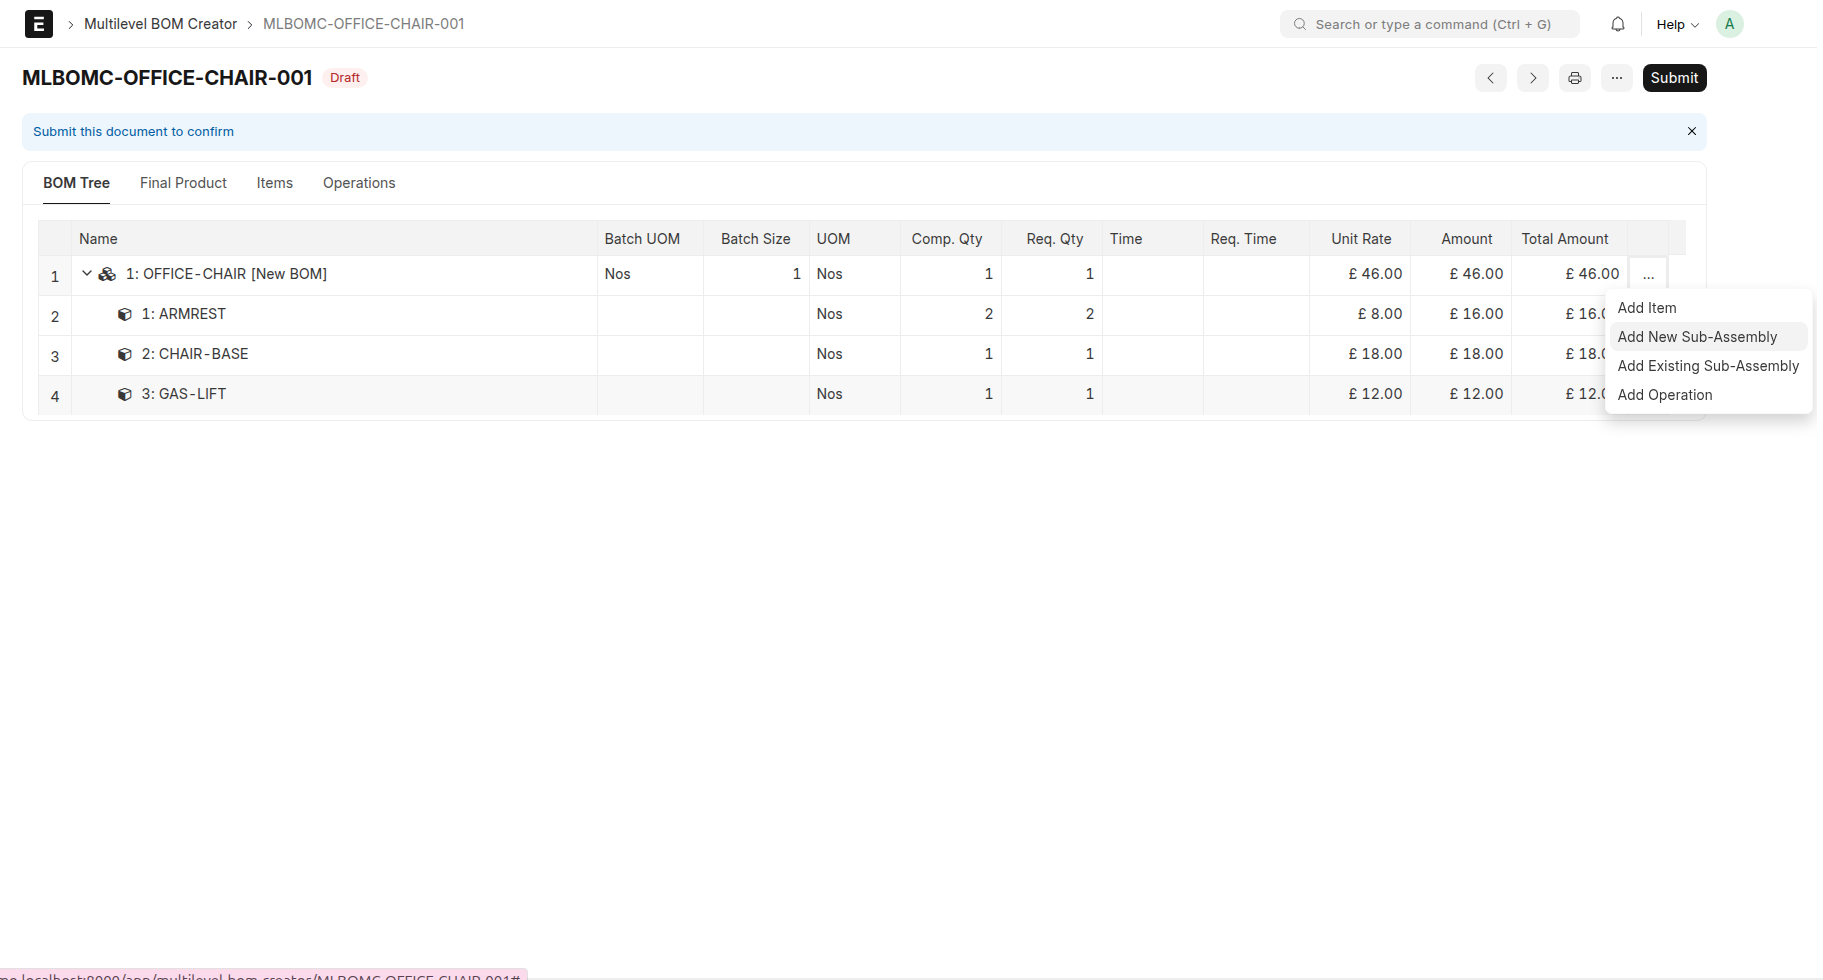 Caption: Choose
 Add New Sub-Assembly from the root item menu.
In the dialog, enter the sub-assembly item, quantity required under the parent, and the batch size for the sub-assembly itself.
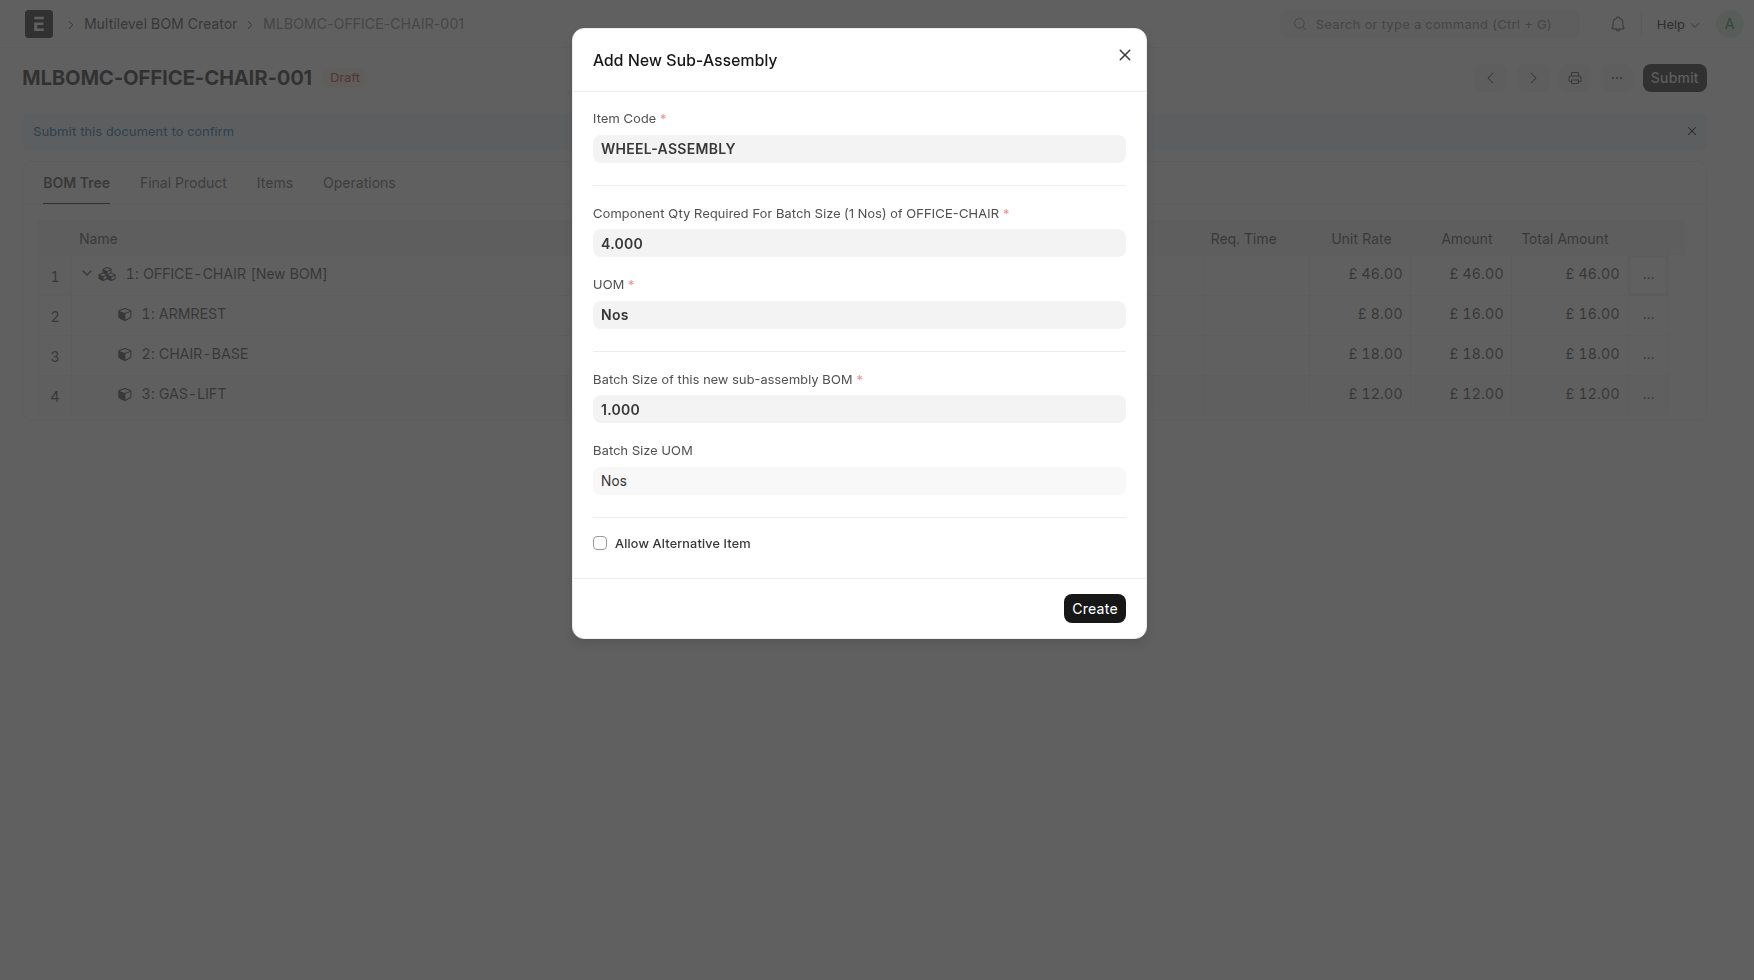 Caption: Enter the new sub-assembly details for
 WHEEL-ASSEMBLY.
After saving, the new sub-assembly becomes part of the tree and you can start building its internal structure.
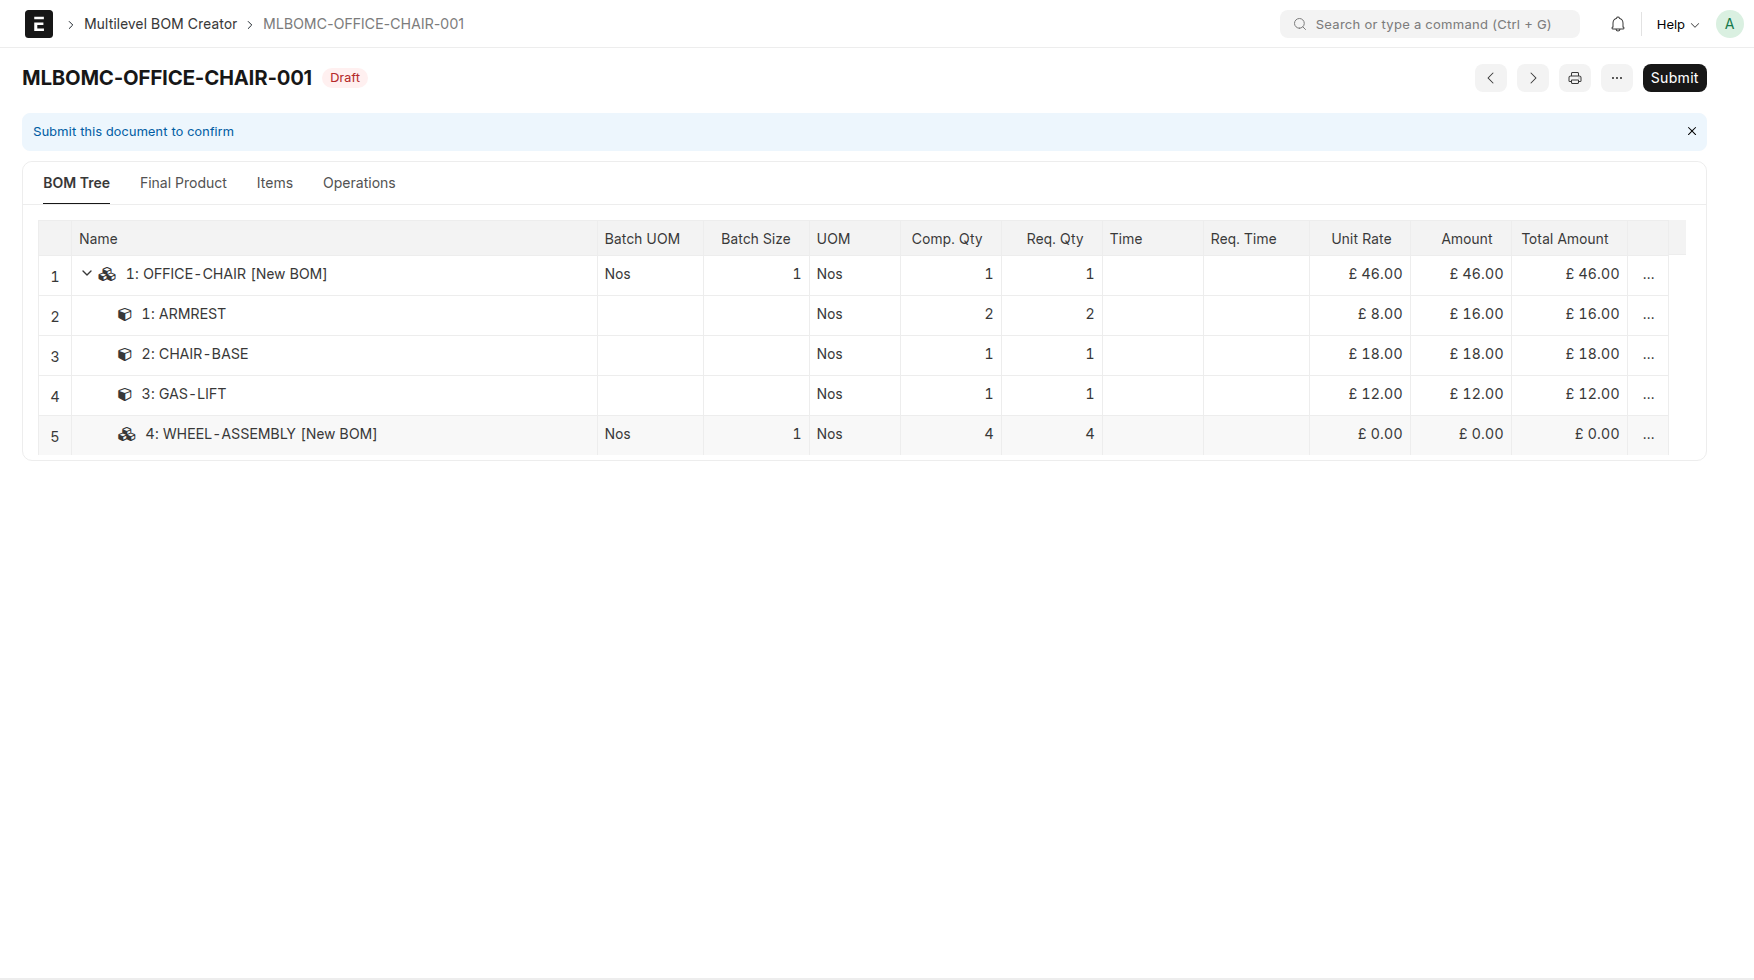 Caption: The new sub-assembly is now part of the BOM tree.
For this example, WHEEL-ASSEMBLY is completed with WHEEL, AXLE-PIN, and BOLT.
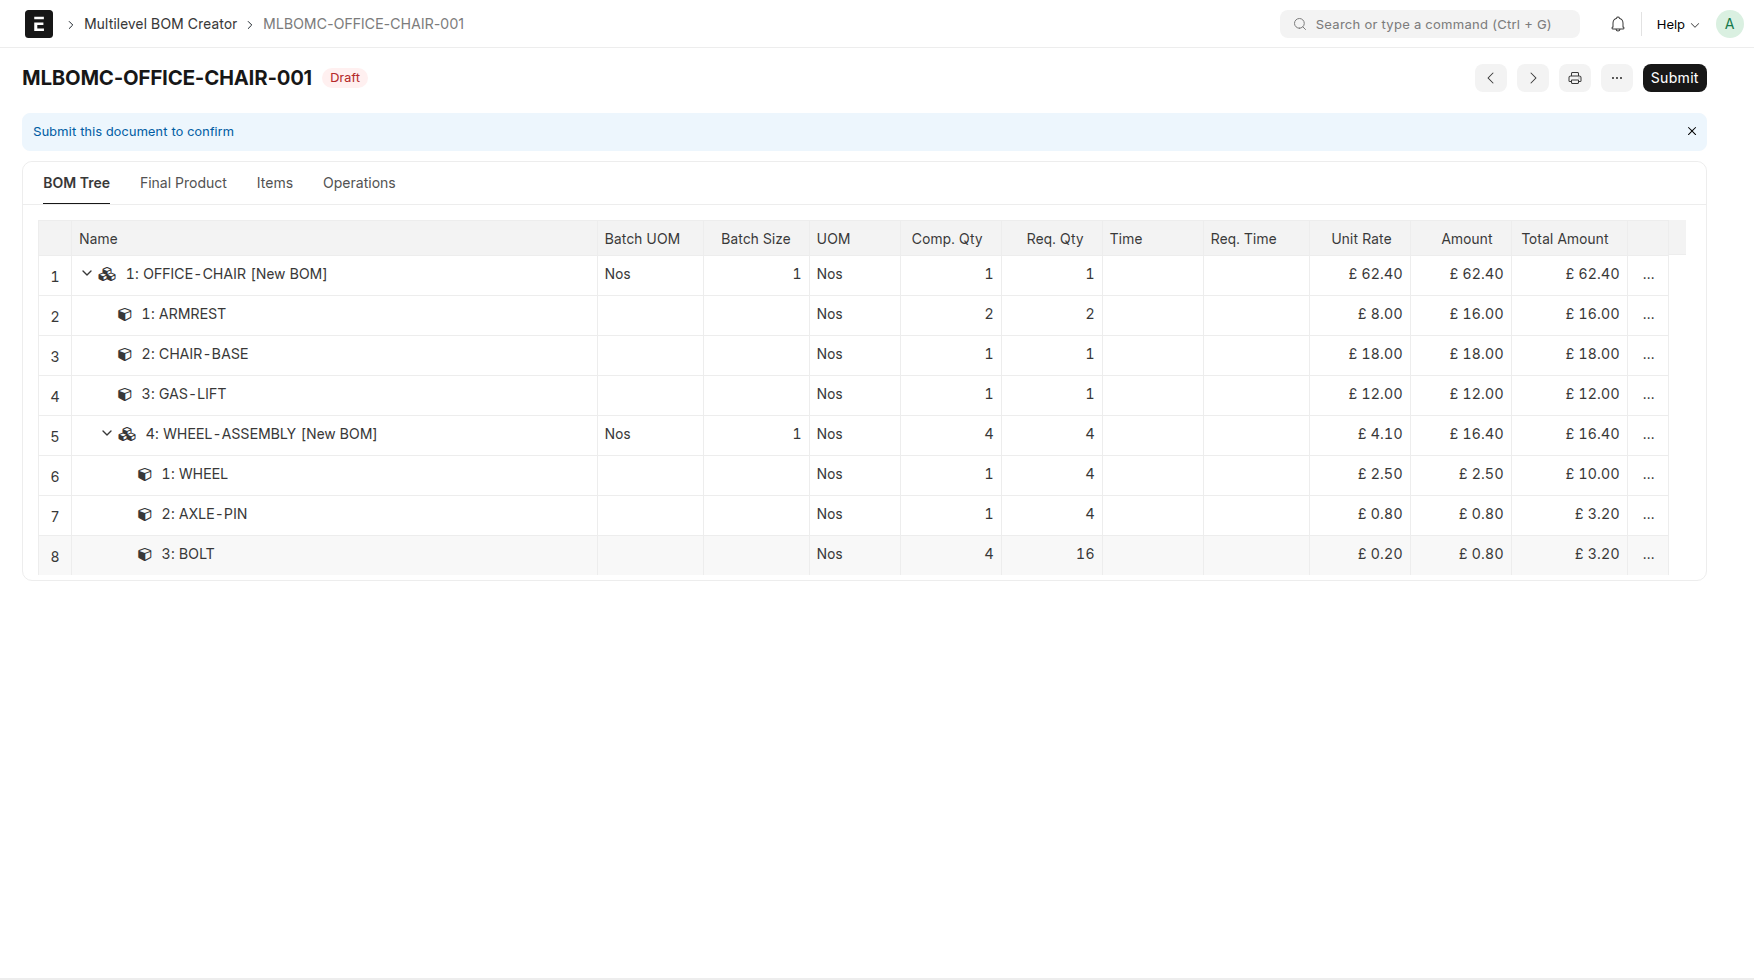 Caption: Complete
 WHEEL-ASSEMBLY by adding WHEEL, AXLE-PIN, and BOLT.
This part of the example highlights how quantities are shown at different levels. In WHEEL-ASSEMBLY, BOLT is entered as qty 4, which means one WHEEL-ASSEMBLY needs 4 bolts. So for the BOLT row, Comp. Qty is 4.
But OFFICE-CHAIR needs 4 WHEEL-ASSEMBLY, so total BOLT needed for the final product is 4 x 4 = 16. So Req. Qty is shown as 16.
In summary, the tree shows Comp. Qty as the quantity required to create the batch size of the immediate parent BOM, and Req. Qty as the quantity required to create the batch size of the root BOM (final product BOM).
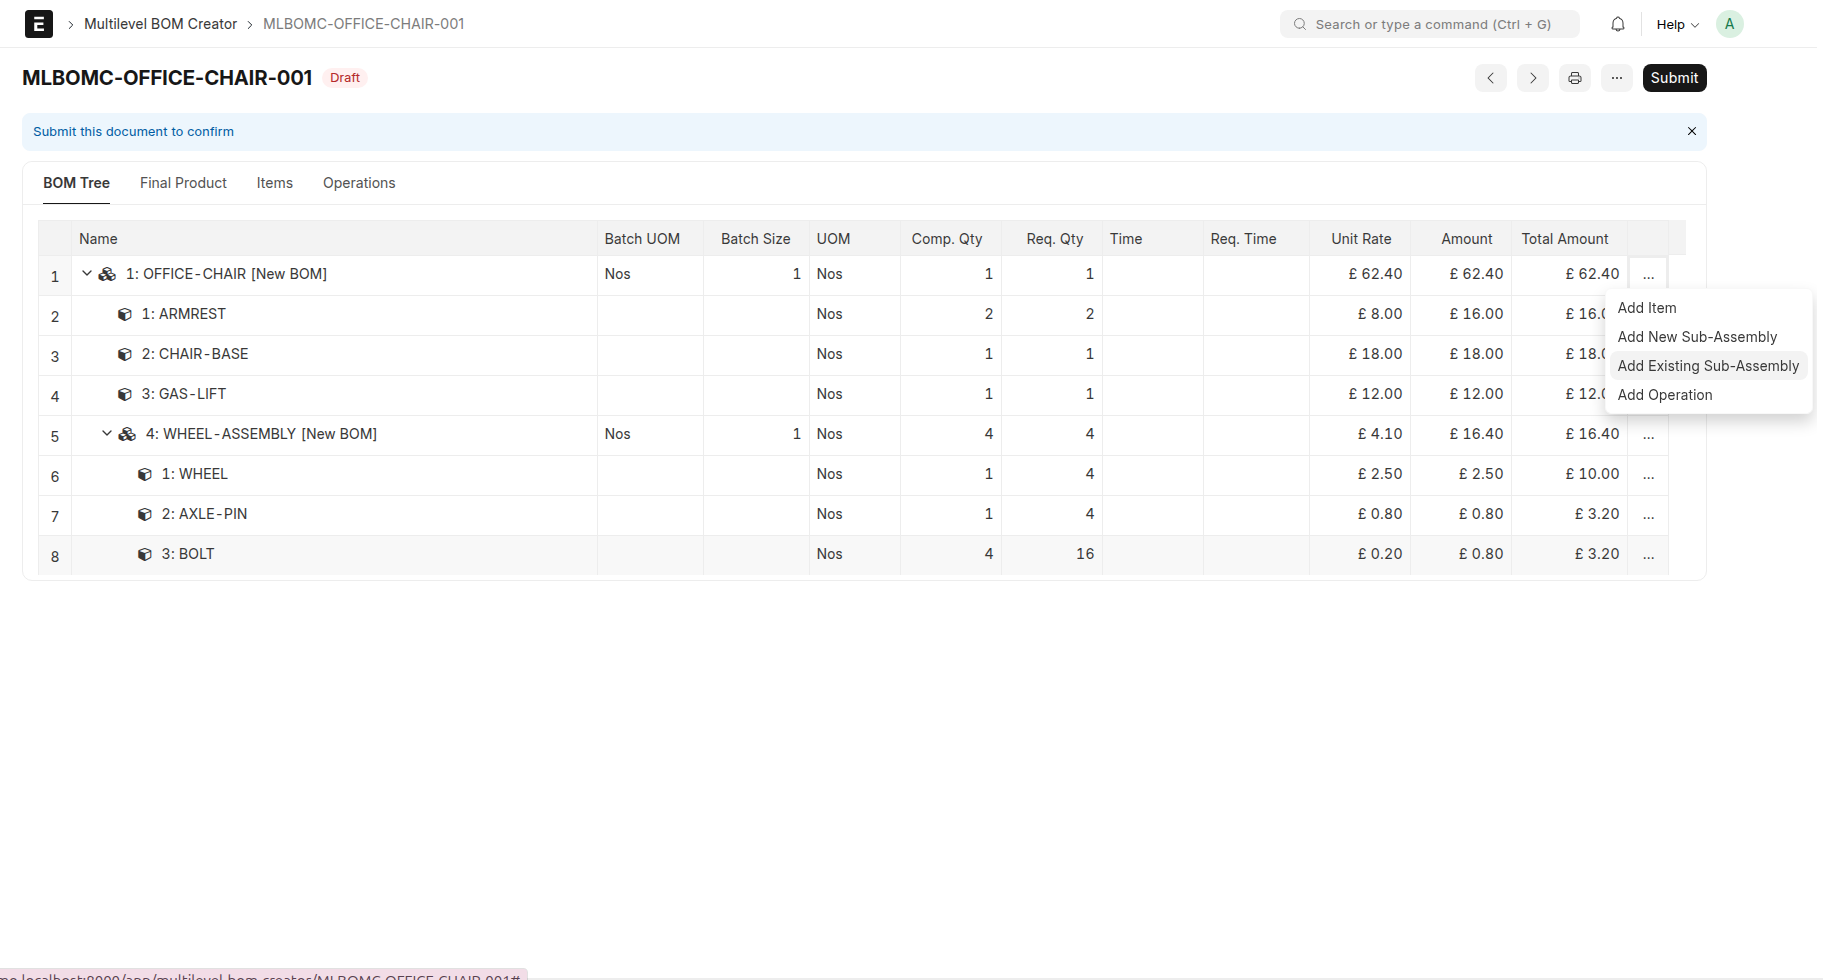
4. Add an Existing Sub-Assembly
Now consider the opposite case: the assembly already exists and you only want to reuse it. For that, use Add Existing Sub-Assembly.
In this example, BACKREST-ASSEMBLY is already defined as a submitted BOM, so we can pull it into the new chair structure.
 Caption: Choose
 Add Existing Sub-Assembly when the BOM already exists in ERPNext.
Select the BOM in the dialog and save it into the tree.
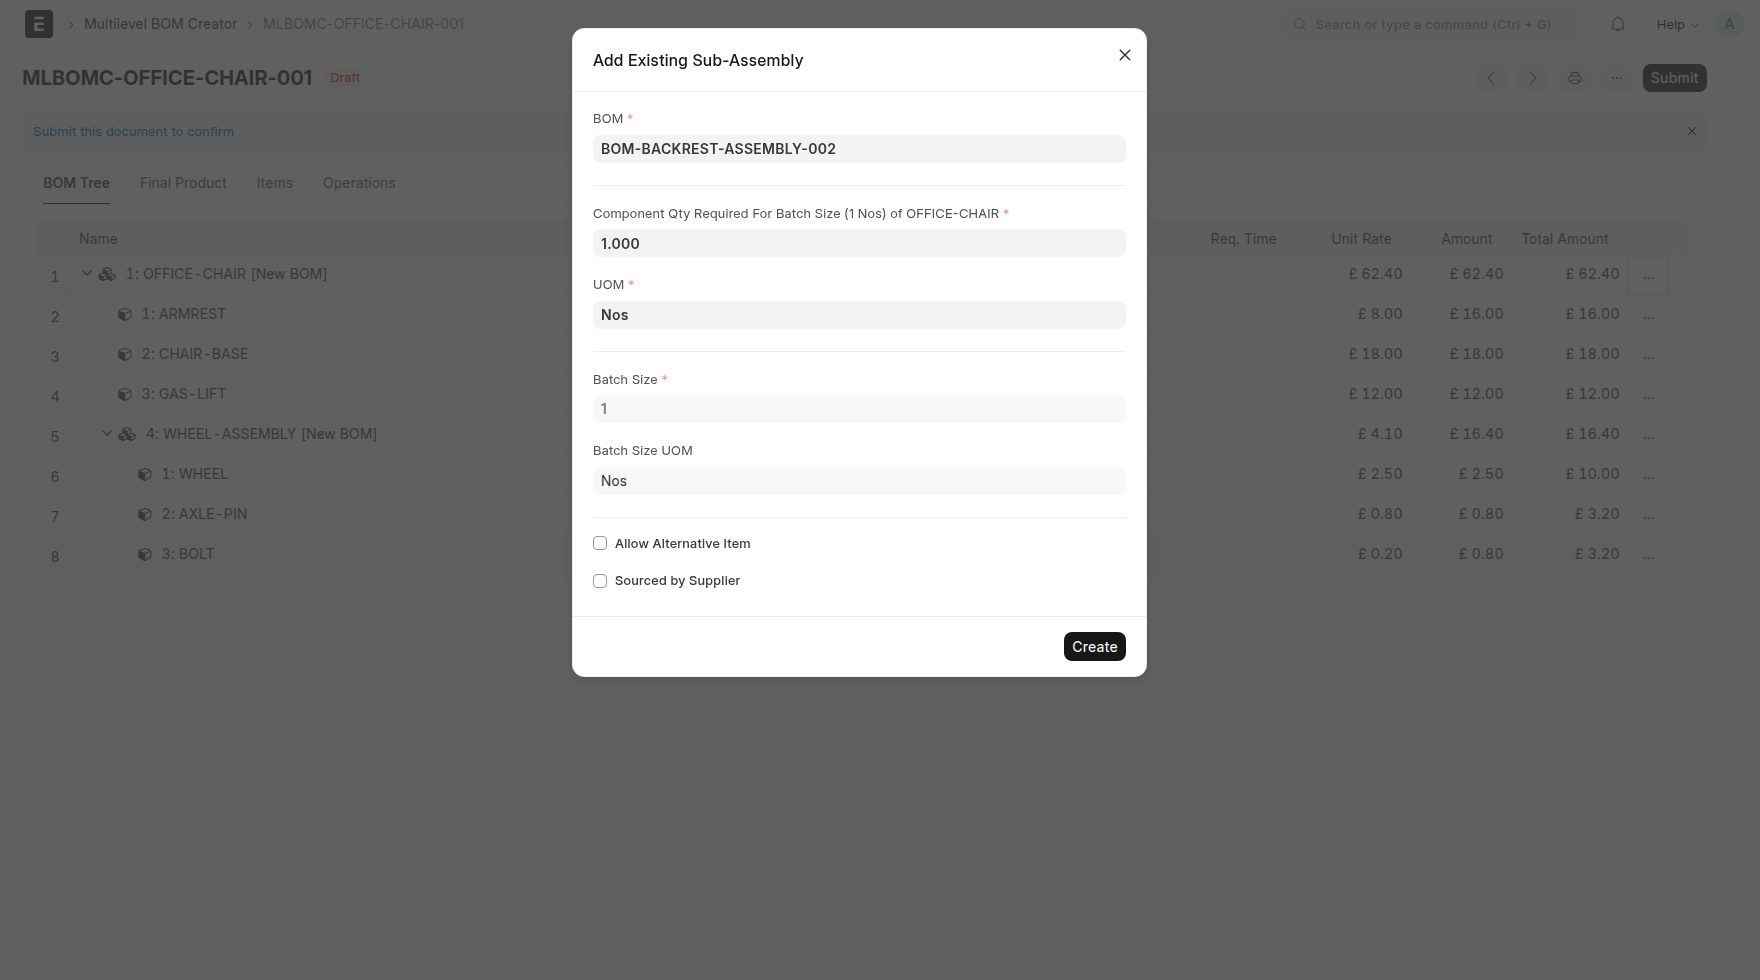 Caption: Select the existing BOM to reuse in the current structure.
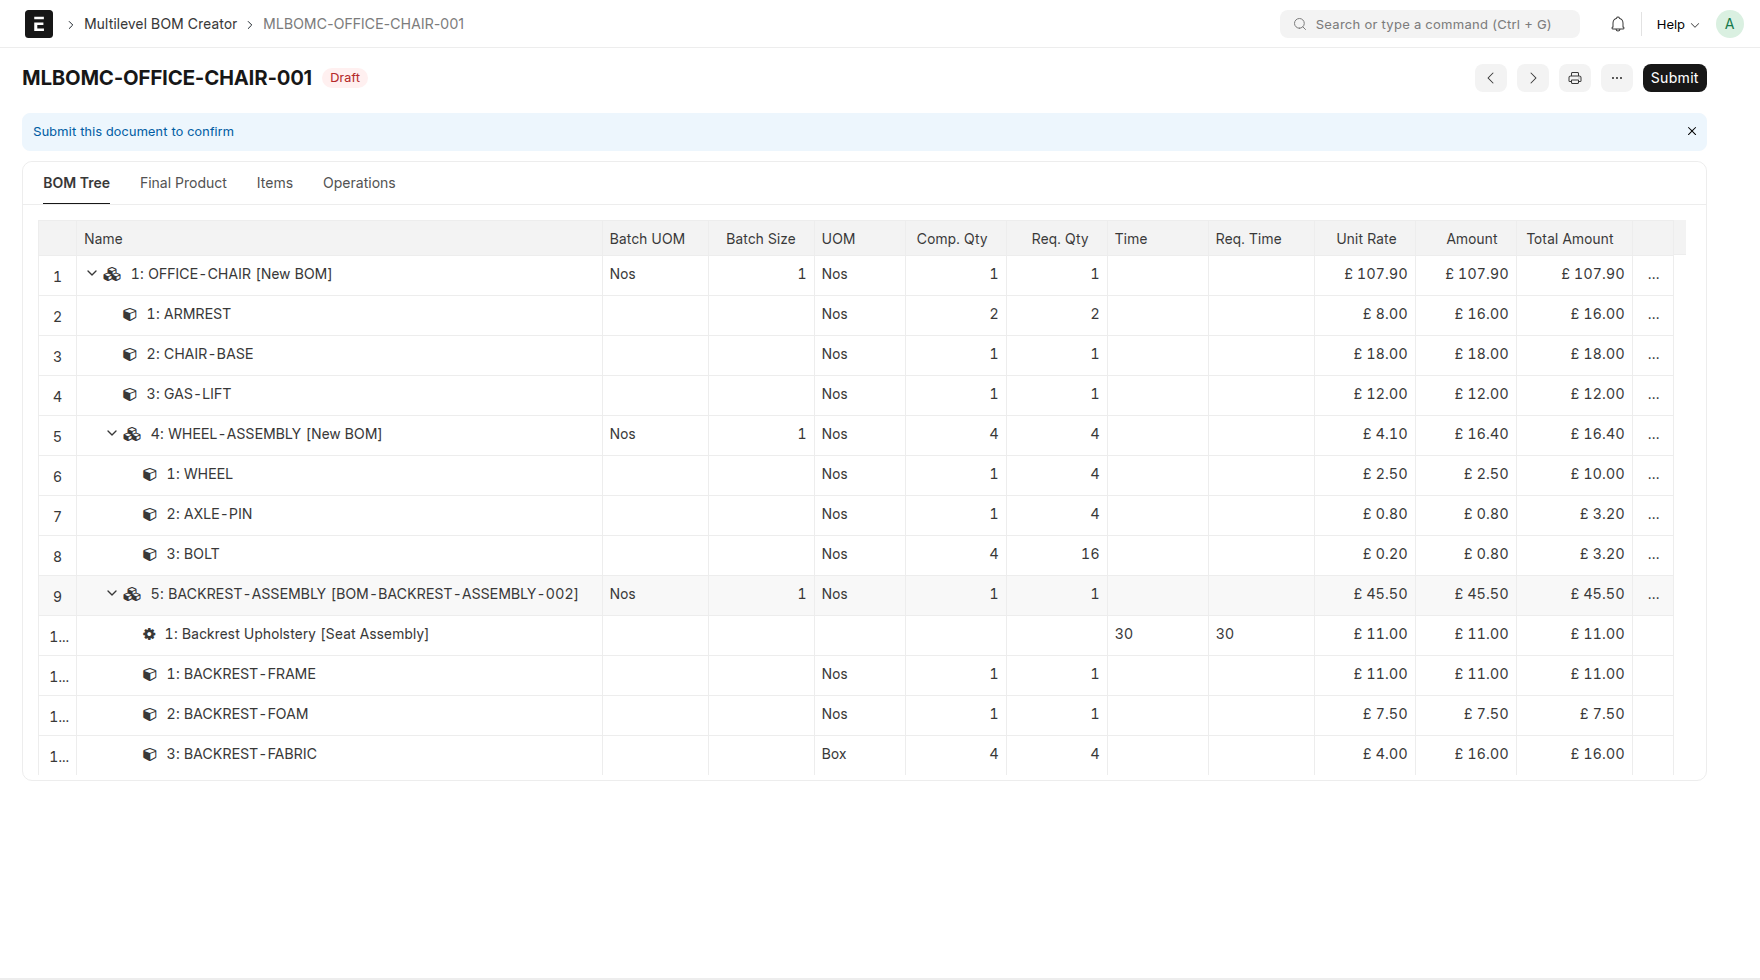
Once added, the existing BOM is expanded fully in the tree so the user can also understand its structure in the same view. Its child nodes appear as projected rows and remain read-only because they represent an already existing BOM.
 Caption: Existing BOMs appear with projected read-only structure.
That is an important detail. Projected rows are there to give visibility into the referenced structure, but they are not editable directly from this tree.
5. Add Operations
Operations can be added exactly where the work is performed. In this example, we show the action once and then complete the remaining operations in the structure.
Here the first example is Seat Upholstery under SEAT-ASSEMBLY.
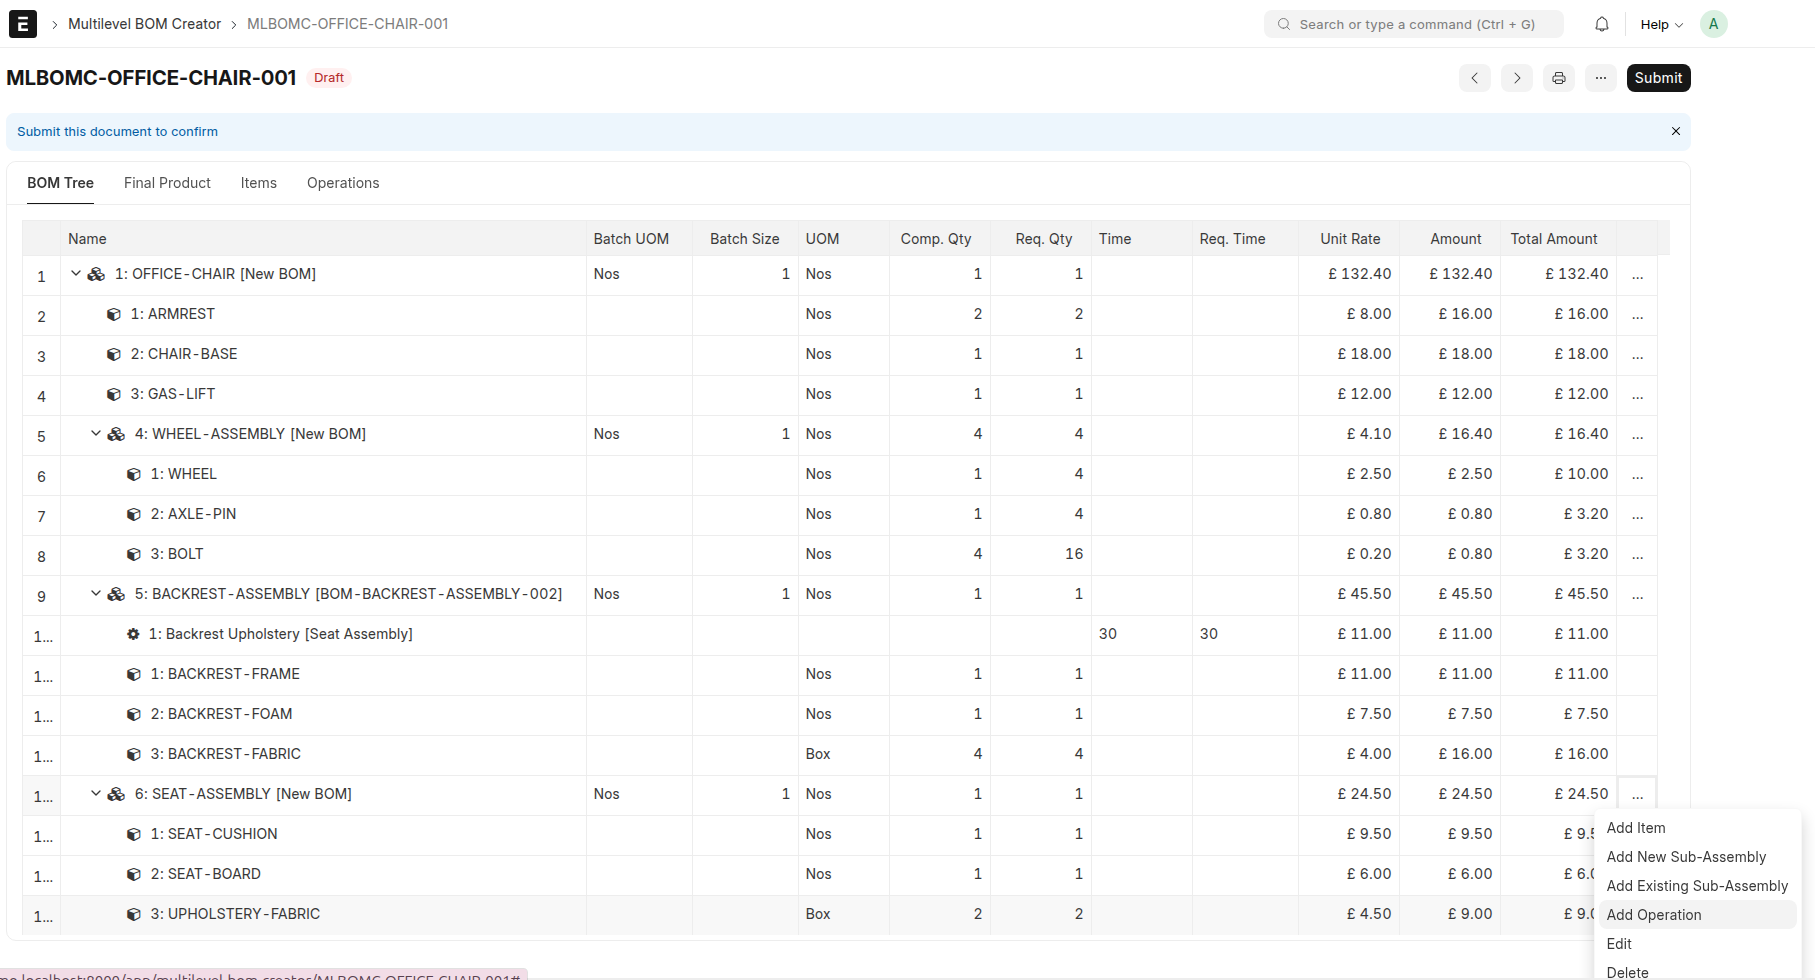 Caption: Use
 Add Operation on the node where the work is performed.
Enter the operation details such as time, fixed-time behavior, operation batch size, and workstation context.
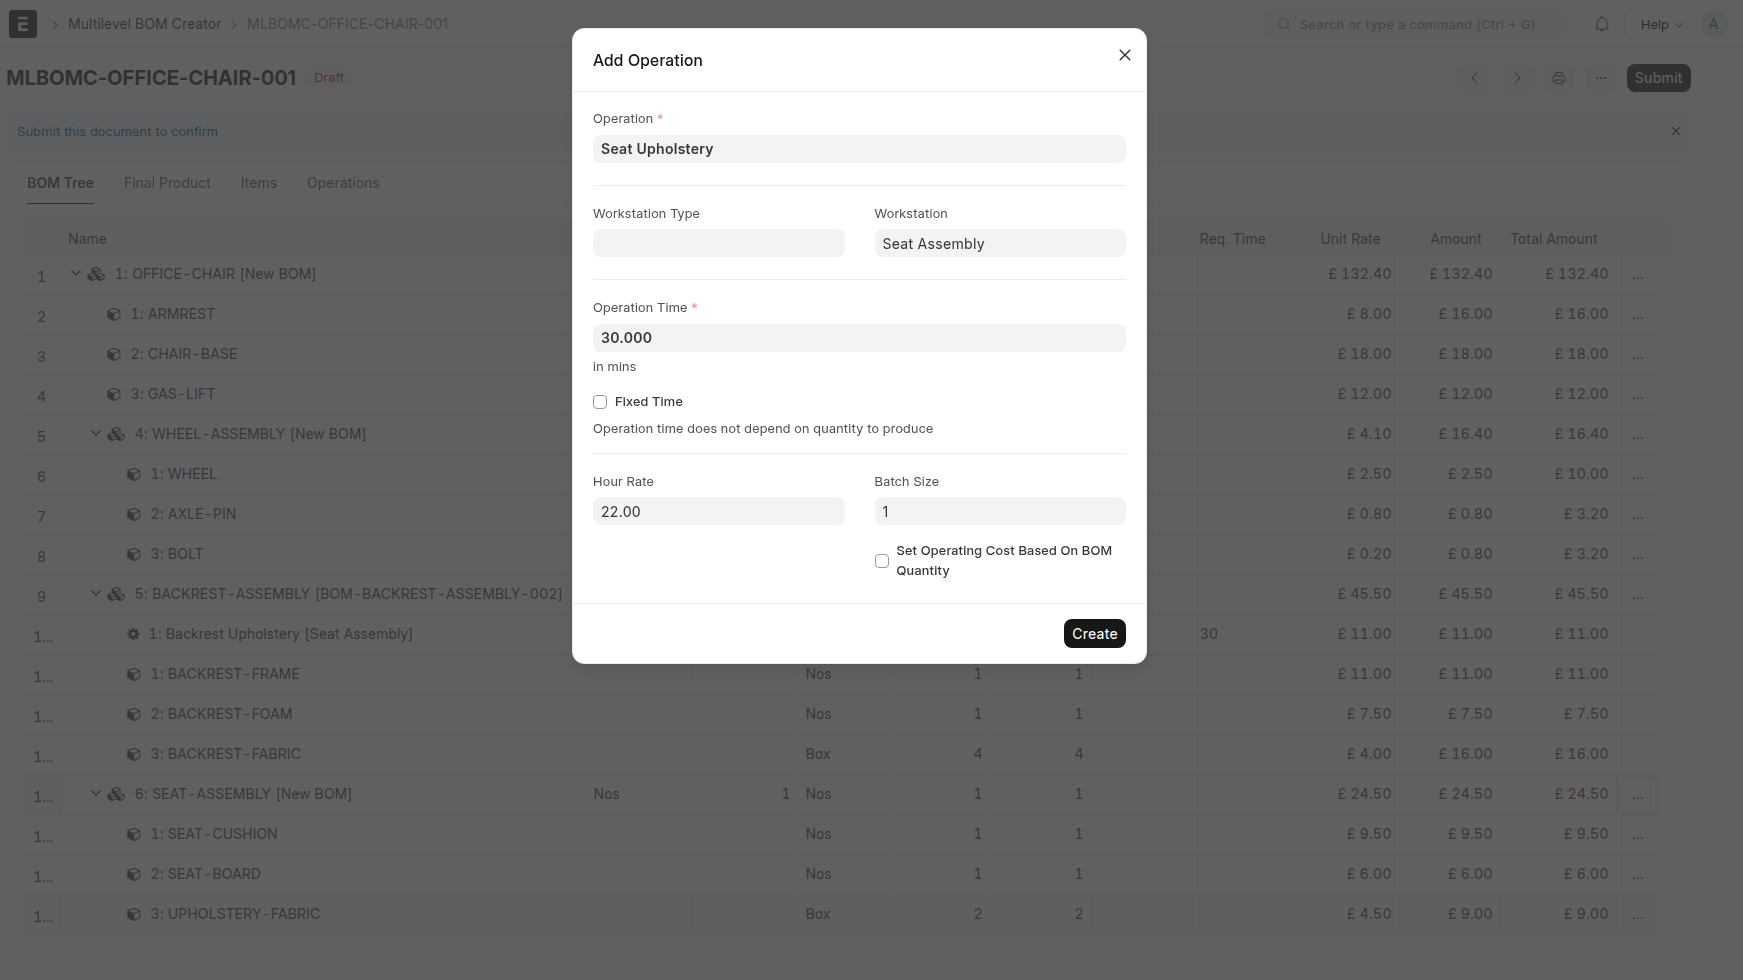 Caption: Enter the operation details, such as time and workstation context.
After saving, the operation becomes part of the tree like any other node.
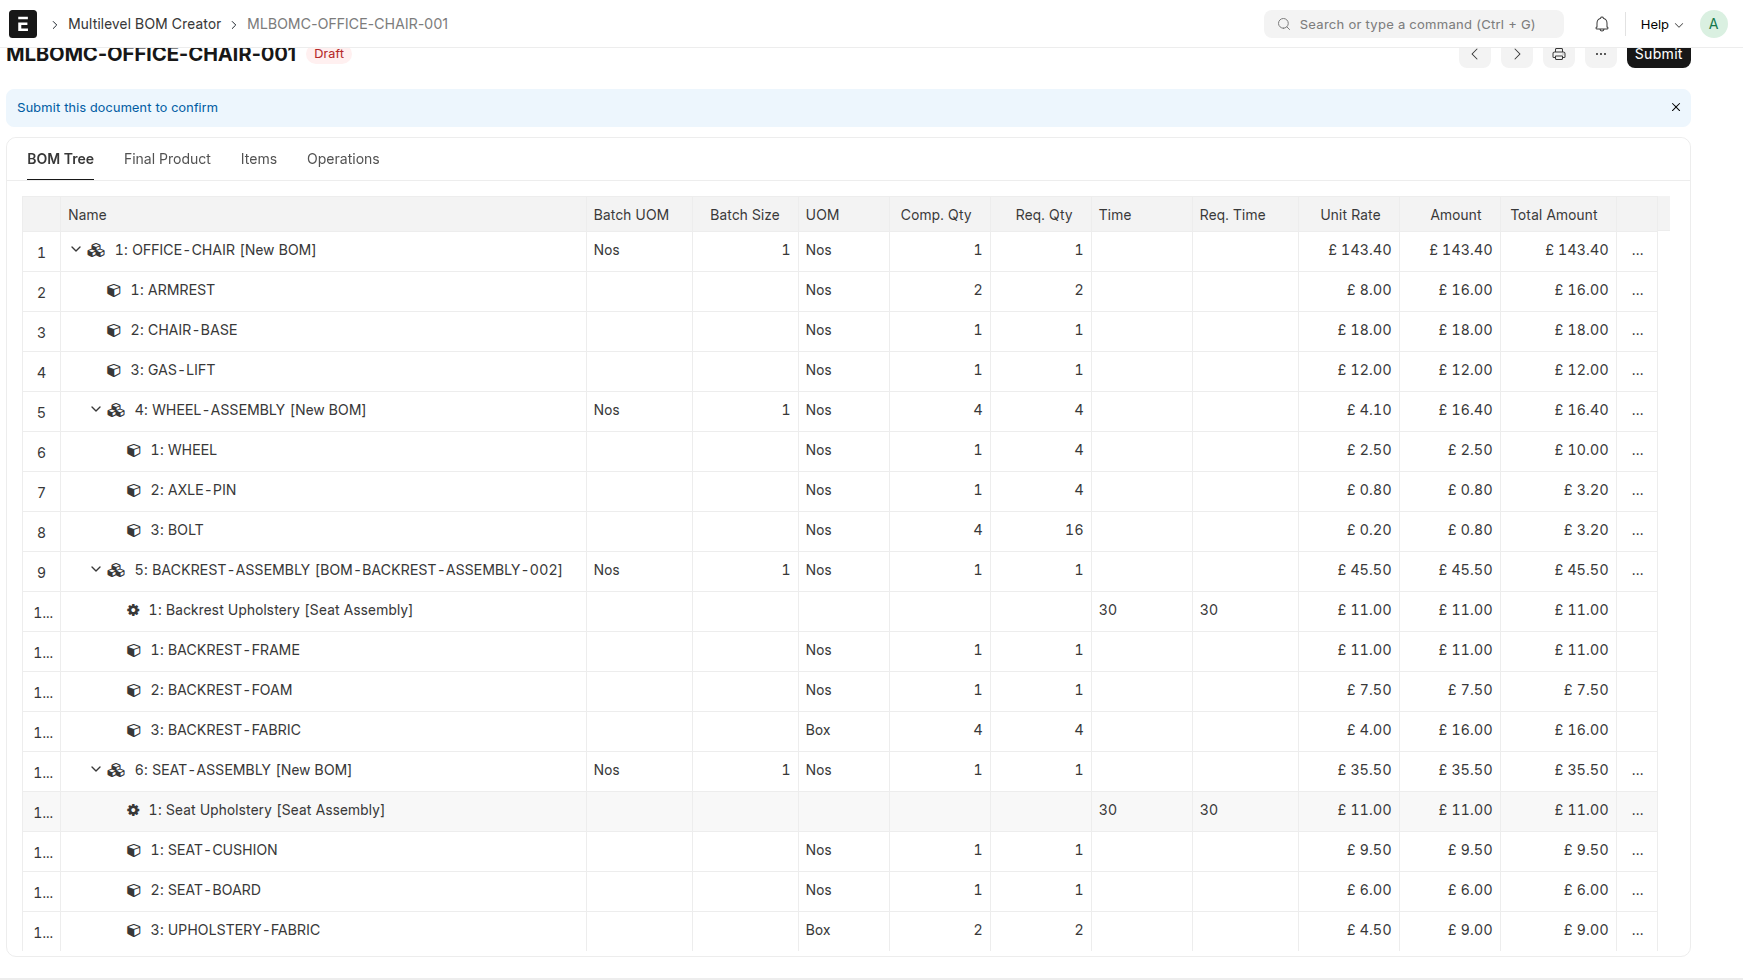 Caption: The first operation now appears in the BOM tree.
From there, complete the remaining operations needed in the structure. In our example, that includes the root-level operations Final Chair Assembly and Final Inspection.
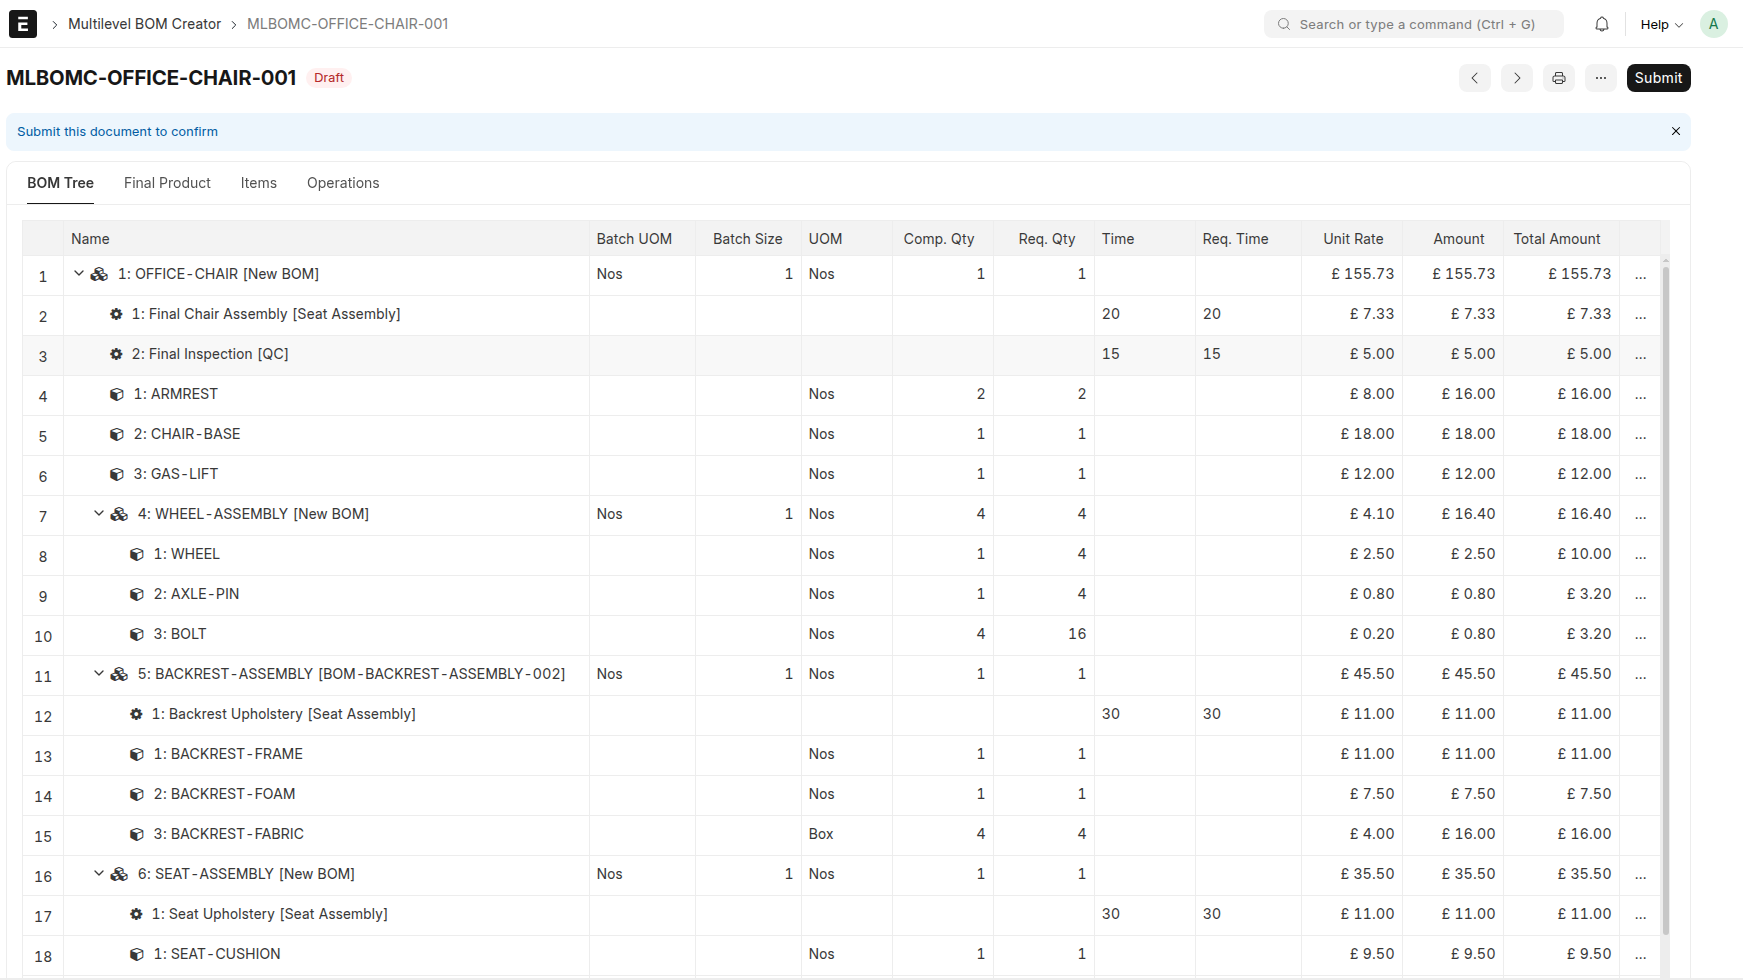 Caption: After the first operation is added, complete the remaining operations needed in the structure.
6. Create the BOMs
Once the structure is complete, submitting the document creates the missing BOMs from the lower levels upward.
In this example, that means:
-
the existing
BACKREST-ASSEMBLYBOM is reused -
a new BOM is created for
WHEEL-ASSEMBLY -
a new BOM is created for
SEAT-ASSEMBLY -
the final BOM is created for
OFFICE-CHAIR
The result is not just one record. You end up with the full BOM set needed for the product structure you built.
The final Chair BOM created from the Multilevel BOM Creator structure.
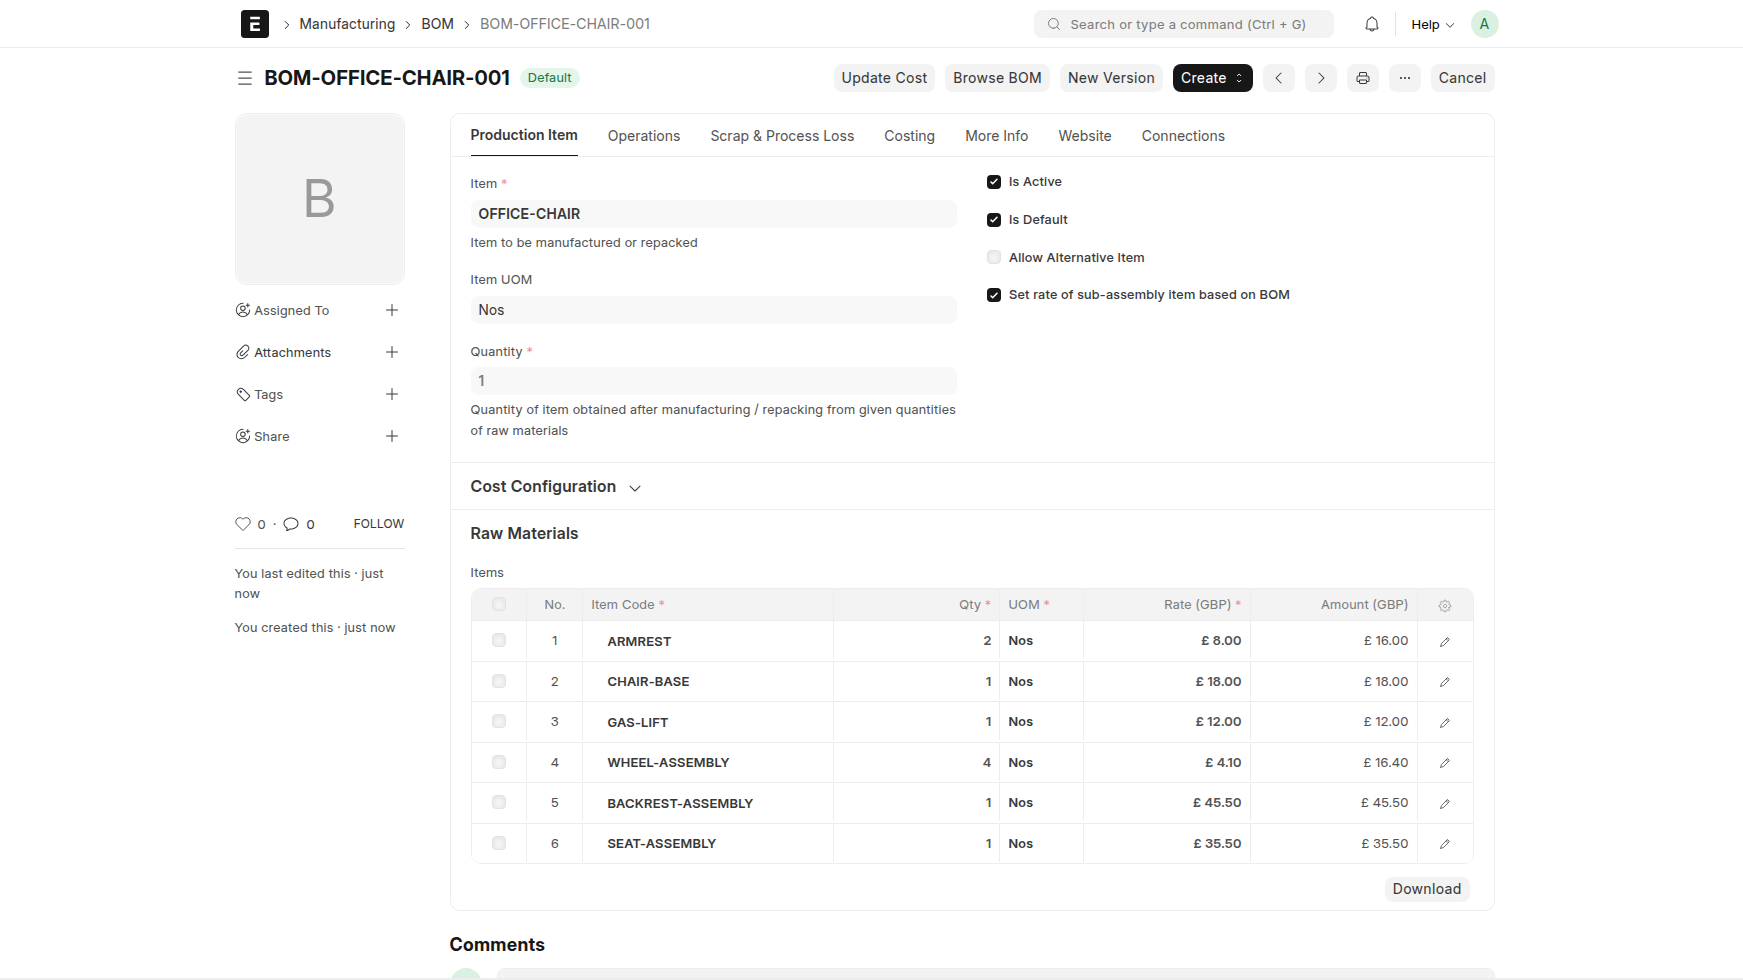 Caption: The final Chair BOM created from the Multilevel BOM Creator structure.
The system also creates the BOM for the new WHEEL-ASSEMBLY sub-assembly.
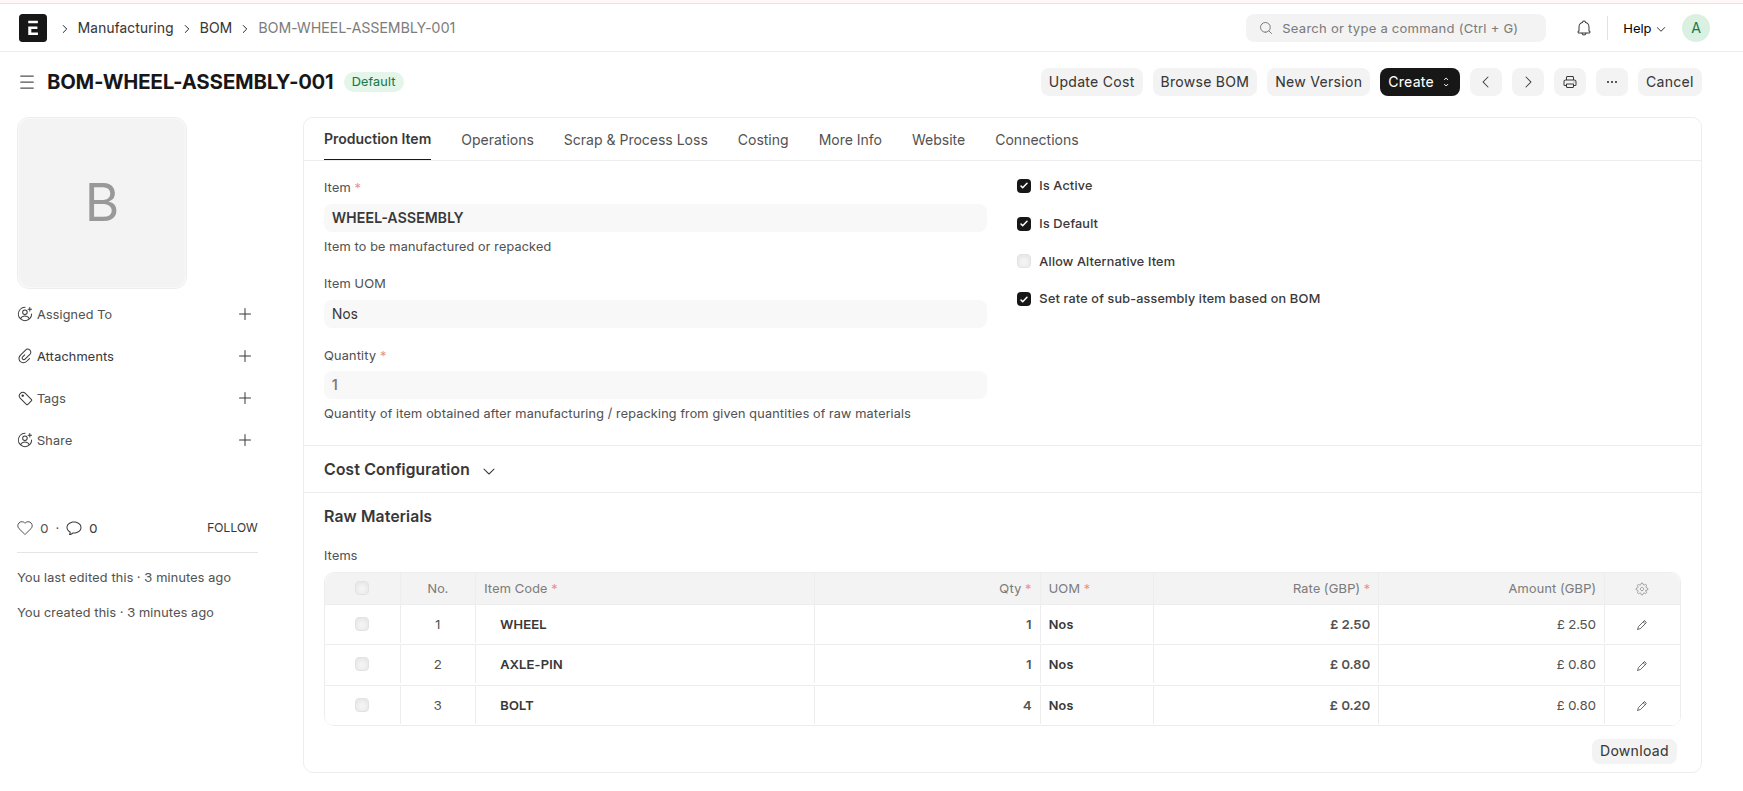 Caption: The system also creates the BOM for the new
 WHEEL-ASSEMBLY sub-assembly.
The system also creates the BOM for the new SEAT-ASSEMBLY sub-assembly.
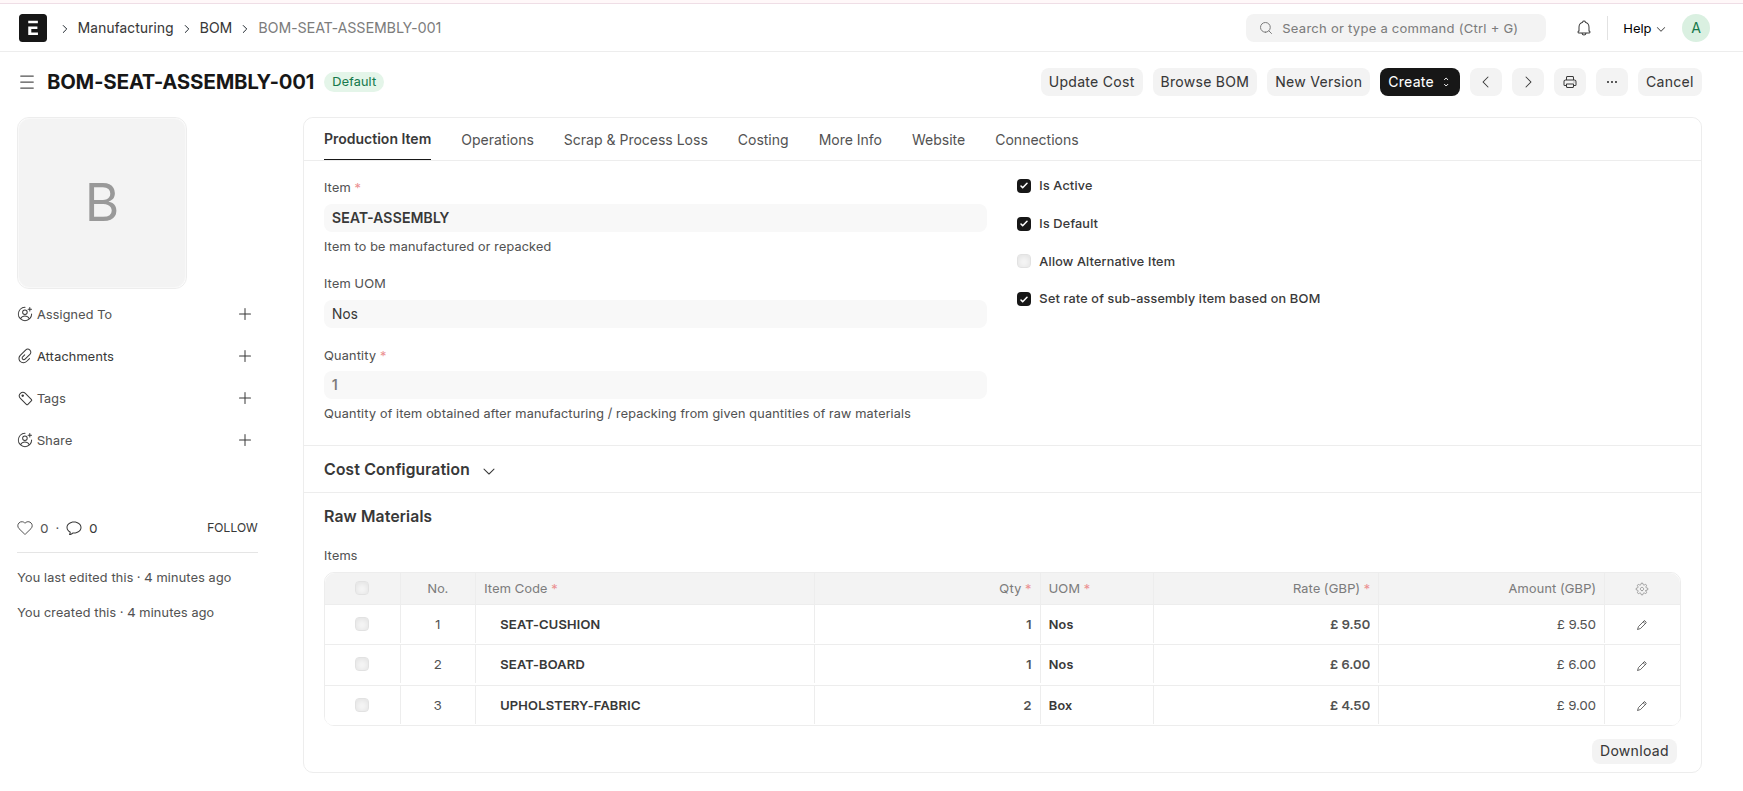 Caption: The system also creates the BOM for the new
 SEAT-ASSEMBLY sub-assembly.
Additional Capabilities
Besides the main tree-building flow, Multilevel BOM Creator also supports a few important scenarios that are useful in real manufacturing setups.
Flexible Cost Calculation Basis
You can change the cost calculation basis from the Final Product tab, and the creator recalculates costs according to the selected method.
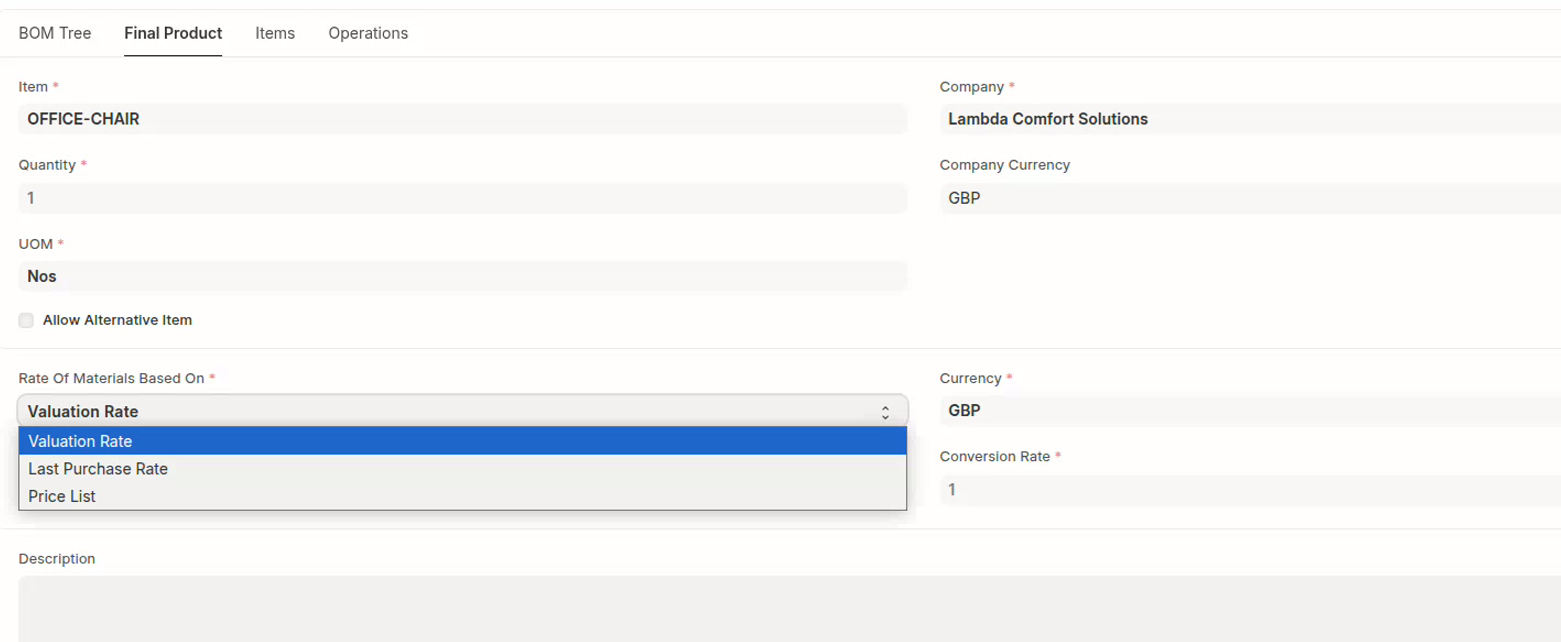 Caption: Change the cost calculation basis from the
 Final Product tab and review the updated cost values.
Different Company Currency and BOM Currency
The creator also supports scenarios where the company currency and the BOM currency are different.
Different Stock UOM and BOM UOM
While adding items, the creator also supports cases where the item’s stock UOM is different from the UOM used inside the BOM being created.
Key Things to Remember
New vs Existing Sub-Assembly
Use Add New Sub-Assembly when the child BOM does not exist yet and should be created from the current document. Use Add Existing Sub-Assembly when the BOM already exists and should simply be reused.
Duplicate BOM
If an existing BOM is close to your requirement but not an exact match, first add it as an existing sub-assembly and then use the Duplicate BOM action. This copies the referenced structure into the current document so the copied immediate children can be adjusted. In the end, it creates a new BOM for that sub-assembly reflecting the adjustments you made.
Closing Note
The main value of Multilevel BOM Creator is that it lets a manufacturing user think about the full product structure in one screen. Instead of creating BOMs one by one and mentally stitching them together, you build the whole picture first and let the system generate the missing BOMs after review.